HONDA
TALON FUEL SYSTEM INSTALLATION GUIDE
(2 SEAT MODEL)

Justin Shriver
Updated: September 5, 2024
Contents
Application Notes
Supported models: 2019+ Honda Talon 1000 (2 seaters, all trims)
The vehicle shown in this document is a modified 2020 Honda Talon (2 seat). Your vehicle could have parts that may or may not be present in the pictures. The pictures are meant to be a reference only. If you have any questions regarding your
installation, please contact T1 Race Development at support@injectordynamics.com.
Item List
|
2019+ Honda Talon FDM Components |
||
|
Item # |
Description |
Qty |
|
1 |
Honda Talon Fuel Rail |
1 |
|
2 |
Pressure Regulator Assembly |
1 |
|
3 |
Honda Talon Backing Plate |
1 |
|
4 |
Pilot Hole Bushing |
1 |
|
5 |
Honda Talon IACV Plate |
1 |
|
6 |
5/32″ Hose Barb, 1/8″ NPT |
1 |
|
7 |
06 ORB to 06 ORB Coupler |
1 |
|
8 |
90° 06 AN Bulkhead Fitting |
1 |
|
9 |
06 AN Bulkhead Nut |
1 |
|
10 |
06 Stat O Seal Washer |
1 |
|
11 |
4mm Black Silicone Hose (5.5″) |
1 |
|
12 |
FDM Assembly |
1 |
|
13 |
Tube Mount |
1 |
|
14 |
M6 Hardware |
4 |
|
15 |
06 AN E85 Rated Hose (68″), Straight and 120° Crimp Ends |
1 |
|
16 |
06 AN E85 Rated Hose (78″), 90° and 90° Crimp Ends |
1 |
|
17 |
06 AN E85 Rated Hose (83″), Straight and 120° Crimp Ends |
1 |
|
18 |
06 AN E85 Rated Hose (77″), 45° and 120° Crimp Ends |
1 |
|
19 |
3/8″ Female EFI to 06AN Male |
1 |
|
20 |
06 ORB Male to 06 AN Male |
6 |
|
21 |
Wire Harness |
1 |
|
22 |
Fuse Holder Assembly |
1 |
|
23 |
Ring Terminal |
2 |
|
24 |
Metal Butt Splice |
2 |
|
25 |
Insulated Butt Splice |
1 |
|
26 |
Heat Shrink |
2 |
|
27 |
11″ Cable Ties |
10 |
|
28 |
3″ Miniature Cable Ties |
4 |
Return Style Fuel System Kit Installation
Fuel Pump Removal
- Remove passenger bottom seat cushion.
- Remove passenger seat and seat slider rails as one unit. See figure 1 as a reference to the seat rail.
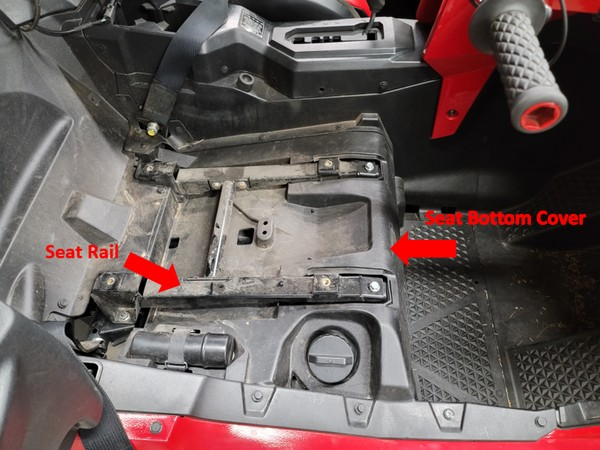
Figure 1: Dashboard Panel Reference
- Remove all necessary hardware and gas cap to remove the seat bottom cover.
- Disconnect the 4-pin power connector and crank the engine to bleed fuel pressure.
- Disconnect the battery once the pressure has bled.
- Disconnect the fuel line and fuel tank breather hose.
- Remove locking ring and fuel pump assembly (drain fuel back into the tank if possible).
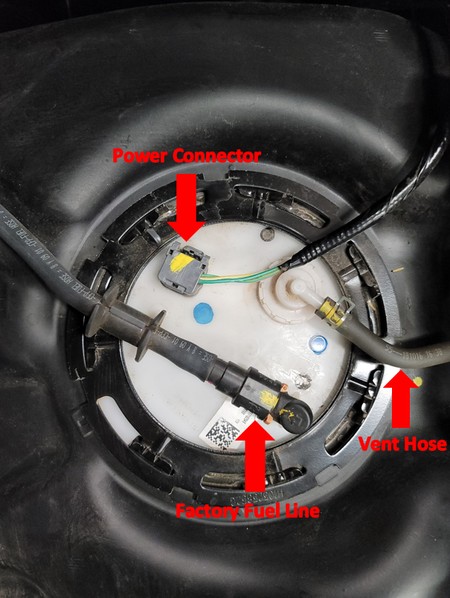
Figure 2: Connection Reference
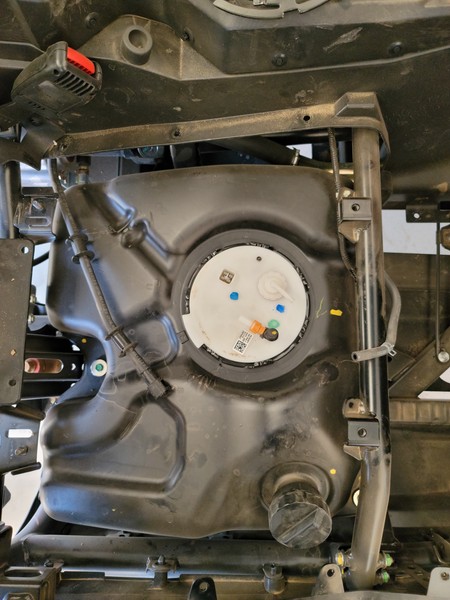
Figure 3: Fuel Tank Reference
Modifying the Fuel Pump for Return Line
- Disconnect both electrical connectors and remove wires from retaining clips.
- Using needle nose pliers, remove the E-style clips from both rods ends and set them aside.
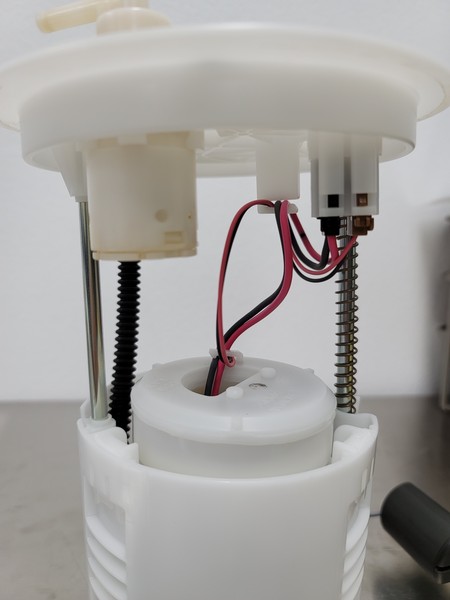
Figure 4: Fuel Pump Wiring Reference
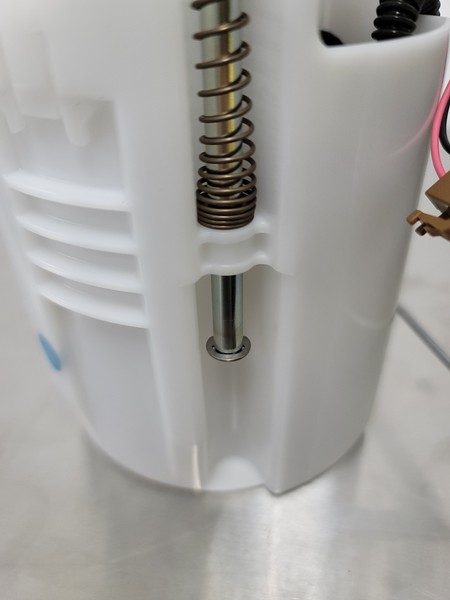
Figure 5: E Clip Reference
- Separate the top portion of the fuel pump assembly, leaving the black hose connected.
- Position the backing plate as seen in Figures 6-7 and clamp it into place.
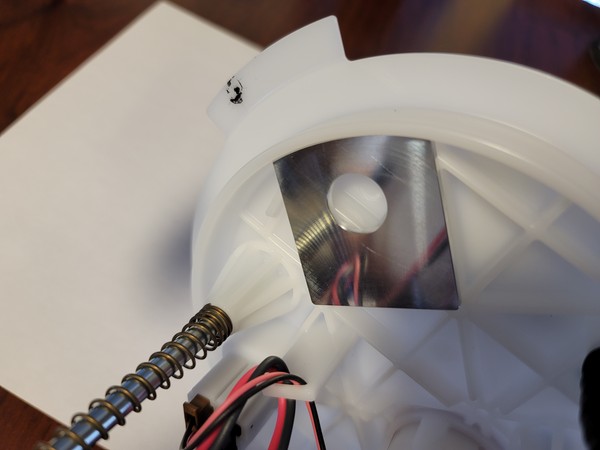
Figure 6: Backing Plate Reference
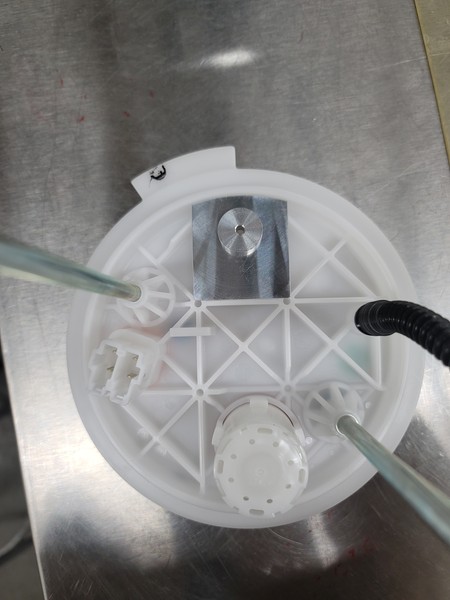
Figure 7: Pilot Hole Bushing Reference
- Start by drilling a 1/8” hole using the provided pilot hole bushing seen in figure 7. Then step up the drill size incrementally to 9/16”.
- Install the 90° bulkhead fitting using stat-o-seal. Use figure 8 below for fitting orientation.
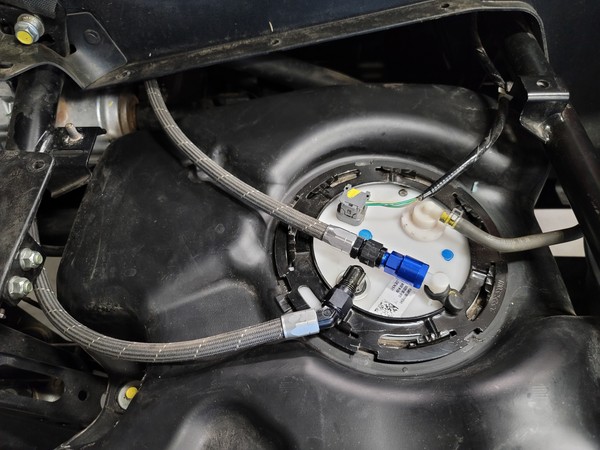
Figure 8: Bulkhead Fitting Reference
- Reinstall the fuel pump assembly into the fuel tank. Use figure 8 as a reference for all connections.
- Install the EFI adapter onto the outlet of the fuel pump.
Fuel Rail, Injector, and
Regulator Housing Install
- Remove the air cleaner lid by turning the lock knobs.
- Remove the snorkel cover located above the rear passenger side tire by removing the trim clips.
- Remove the air cleaner housing. Use figures 9-11 for reference.
- Disconnect the snorkel duct by loosening the connecting hose band screw and removing the trim clips.
- Disconnect the IAT sensor located on the back of the housing. (Refer figure 9).
- Release the hose clip seen in figure 10.
- Disconnect the crankcase breather hose.
- Loosen the two air cleaner connecting hose band screws seen in figure 11.
- Remove the (3) 10mm mounting bolts.
- Disconnect the IACV and injector electrical connectors seen in figure 12.
- Disconnect the fuel line from the fuel rail.
- Remove the (4) 8mm bolts to uninstall the fuel rail and injectors. Make sure to set aside the factory cushions seen in figure 13 because they will be reused.
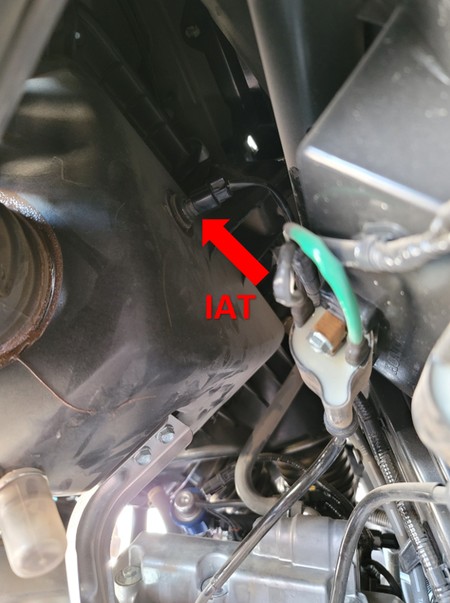
Figure 9: Bulkhead Fitting Reference
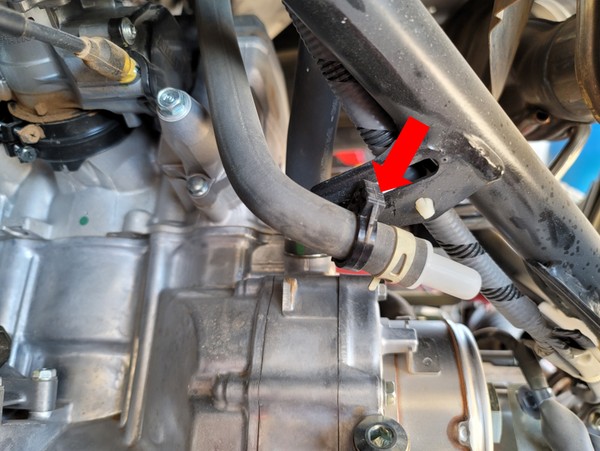
Figure 10: Bulkhead Fitting Reference
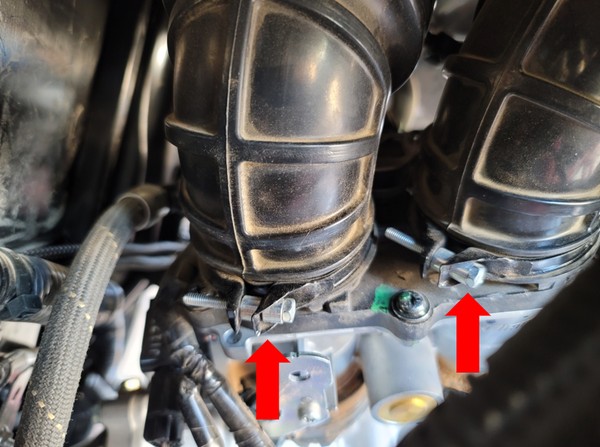
Figure 11: Bulkhead Fitting Reference
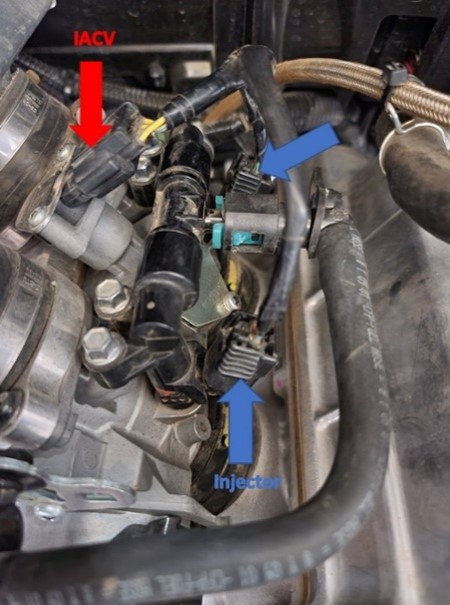
Figure 12: Bulkhead Fitting Reference
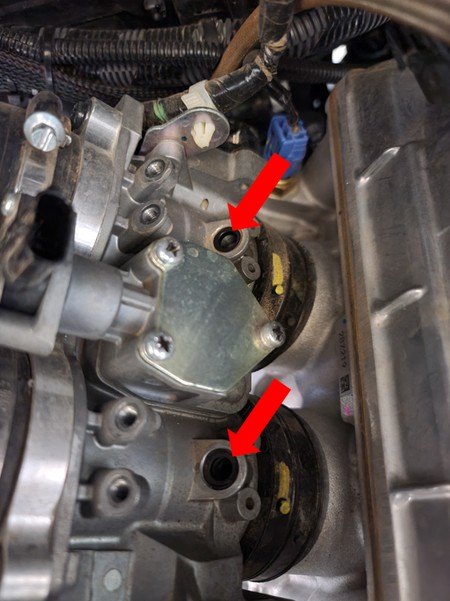
Figure 13: Bulkhead Fitting Reference
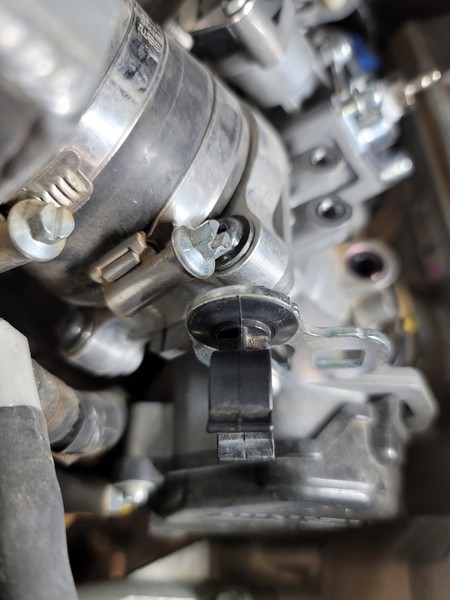
Figure 14: Bulkhead Fitting Reference
- Loosen and remove the 3 Phillips head bolts to remove the IACV cover plate (Take care not to strip out the heads of the bolts. Apply firm pressure while breaking loose)
- Install the new IACV plate provided in the kit.
- Wrap the barb adapter threads with thread tape and install the adapter into the plate ( Do not over tighten)
- Remove the factory fuel line retaining clip seen in figure 14.
- Install the -6 fittings.
- Install the -6 ORB to -6 AN on the inlet of the rail towards the front of the vehicle.
- Install the -6 ORB swivel fitting on the outlet of the rail towards the rear of the vehicle. The adjustable lock nut needs to be installed into the regulator.
- Install -6 ORB to -6 AN fitting into the bottom of the regulator housing.
- Thread on the regulator housing to the swivel fitting until the threads bottom out, then back out one turn. Do not tighten the lock nut.
- Install the ID injectors into the fuel rail (Apply some grease on all O-rings)
- Install fuel rail and injectors onto throttle body ensuring to properly seat the bottom of the injector on the factory cushions (Do not over tighten bolts). Use figure 15 as a reference.
- Tighten the lock nut to the regulator housing. Use figure 17 as a reference to the regulator housing orientation.
- Connect the supplied vacuum hose to the regulator and hose barb on the IACV plate. Secure the hose ends with the provided 3” cable ties.
- Reconnect the IACV and injector electrical connections using the supplied adapters for the injectors.
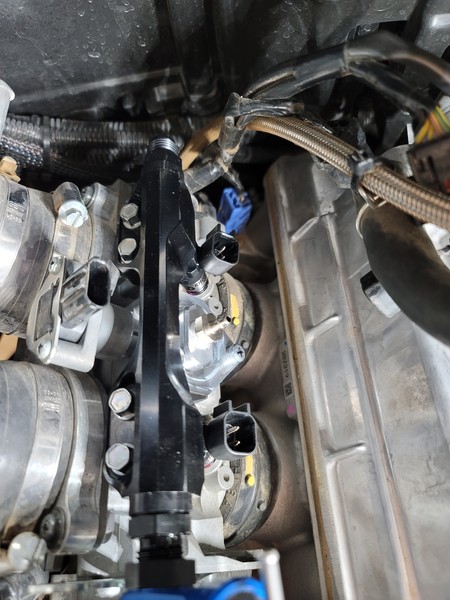
Figure 15: Bulkhead Fitting Reference
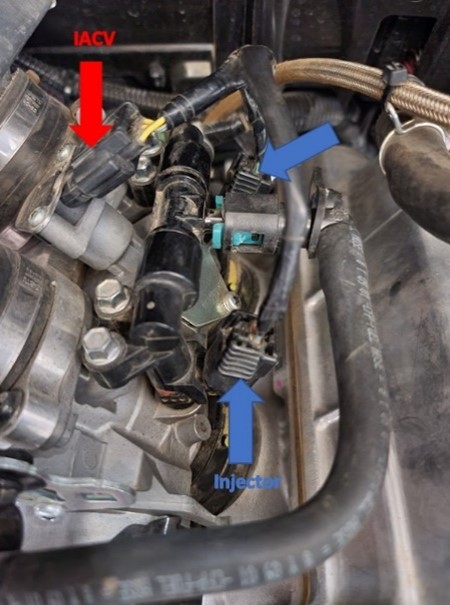
Figure 16: Bulkhead Fitting Reference
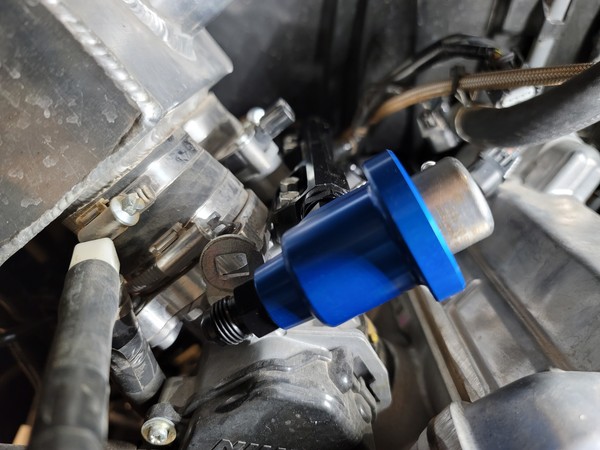
Figure 17: Bulkhead Fitting Reference
FDM Installation
Mounting the FDM
- Remove the hood on the front of the vehicle.
- Install the FDM in the front of the vehicle as shown in figure 18.
- Using the supplied tube mount and m6 hardware, ensure that the FDM will not rub on any other components and that the tank is level vertically.
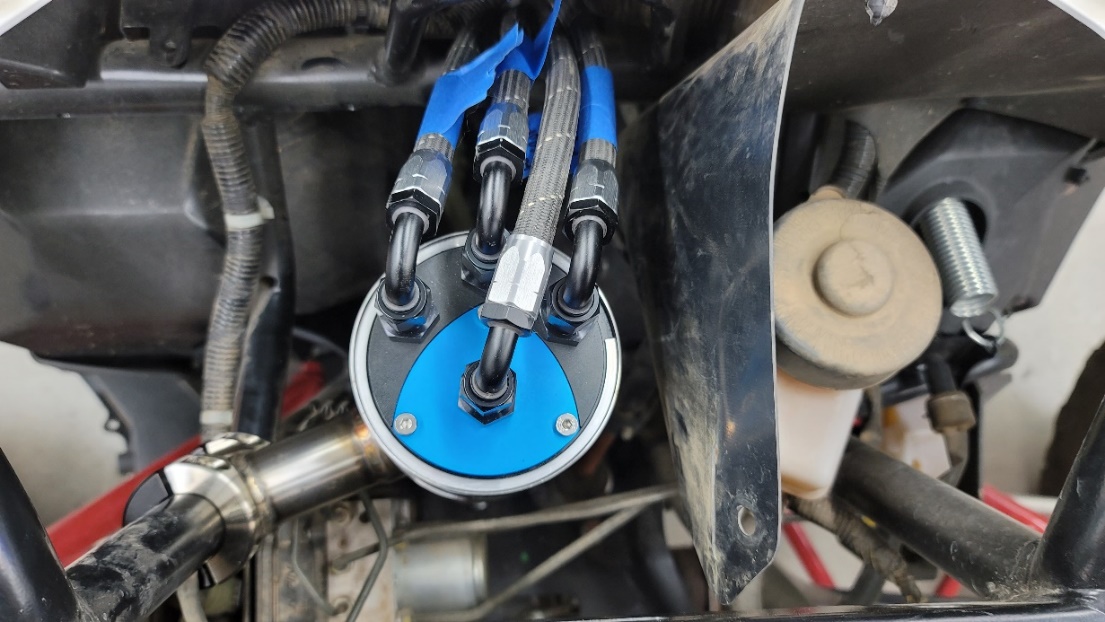
Figure 18: FDM Mounting Reference
Fuel Line Removal and Installation
- Remove the factory fuel line from the two retaining clips located above the drive shaft and two brackets
located
on the firewall and driver side of engine. - Remove two of the rubber retaining sleeves from the factory fuel line by removing electrical tape.
- Install the supplied 6AN to 6 ORB adapters into the top of the FDM. Use figure 19 as a reference for FDM connections. Ensure hoses are not rubbing on adjacent fittings. Take caution to not rotate top cap while tightening adapters and fittings.
- Port 1 – 6AN to 6 ORB. FDM feed to fuel rail (-6 hose with 90° fitting)
- Port 2 – 6AN to 6 ORB. Feed from OEM fuel tank (-6 hose with 120° fitting)
- Port 3 – 6AN to 6 ORB. FDM return to OEM fuel tank (-6 hose with 120° fitting)
- Port 4 – 6AN to 6 ORB. Return from regulator (-6 hose with 120° fitting)
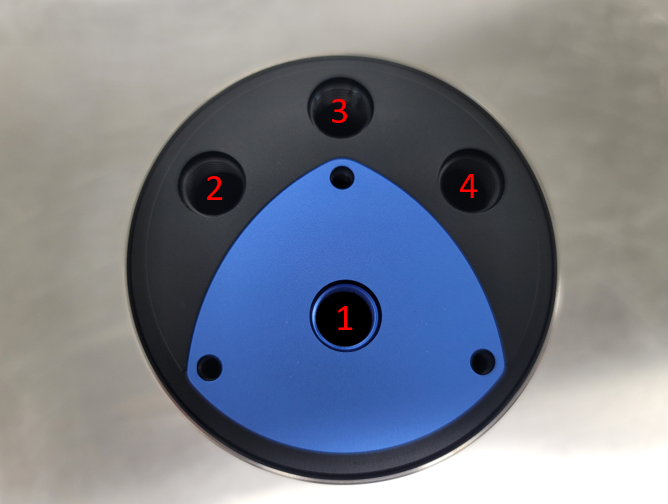
Figure 19: FDM Port Reference
- Gain access to the center console by removing the Center Instrument Panel, Top Center Console Panel, and Right Center Console Panel. Use the center console frame to secure hoses.
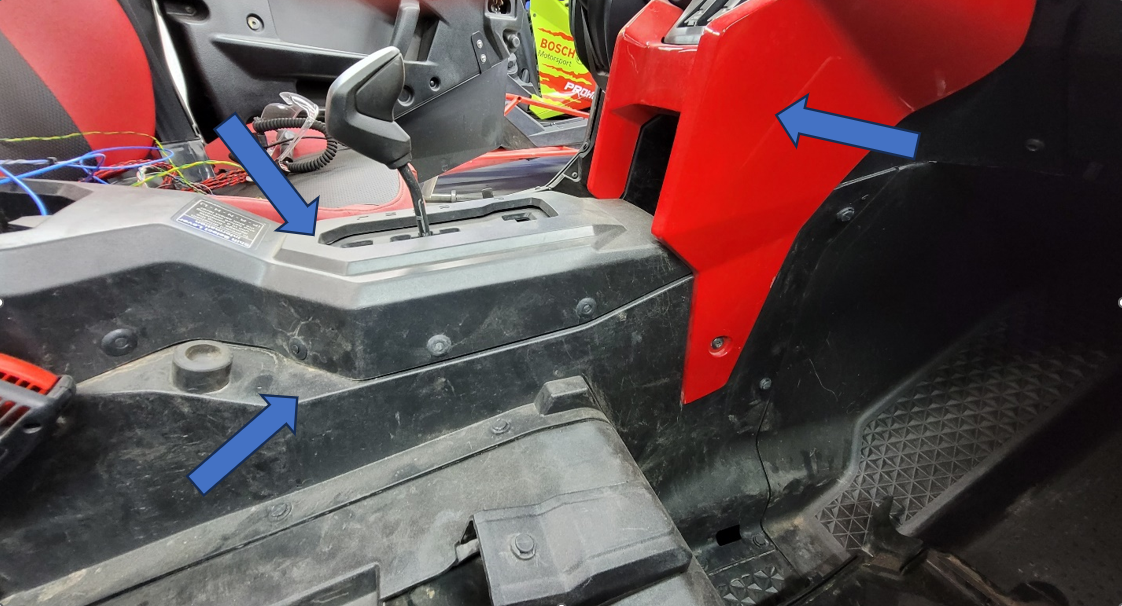
Figure 20: Panel Reference
- Route the 68” -6 hose from the OEM fuel tank to the FDM through the center console. The straight fitting will connect the EFI fitting that was previously installed on the OEM fuel pump. Connect the 120° fitting to port 2 on top of the FDM.
- Route the 77” -6 hose alongside the previous hose to the OEM fuel tank. Connect the 45° fitting to the bulkhead fitting in the fuel pump. Connect the 120° fitting to port 3 on top of the FDM. Use figure 21 as a reference for the routing of the two hoses at the OEM tank.
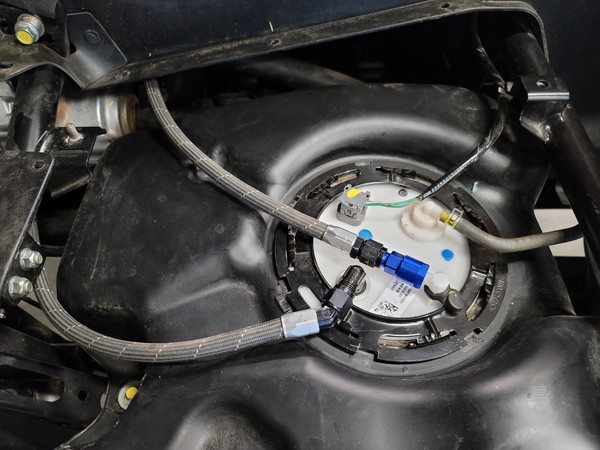
Figure 21: Routing Reference
- Install one of the retaining sleeves on the 78” -6 hose, 13.5” from the 90° fitting. Route the hose from the FDM to the fuel rail, reusing the two clips above the drive shaft. Insert the rubber sleeve into the bracket on the firewall (see figure 22). Connect one 90° fitting to the fuel rail and the other 90° fitting to port 1 on top of the FDM.
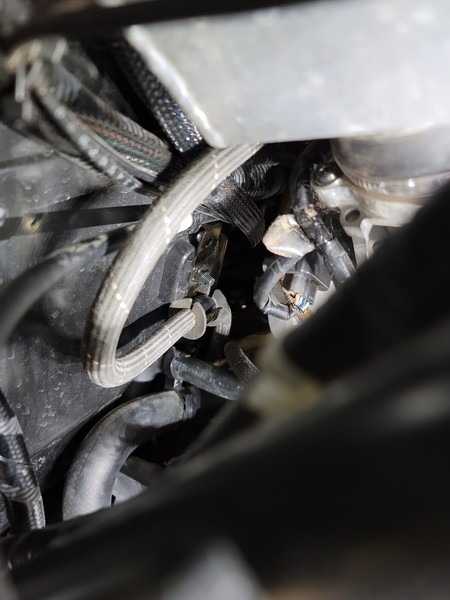
Figure 22: Routing Reference
- Install the other rubber retaining sleeve on to the last -6 hose, 12” down from the straight fitting.
Route the straight fitting through the center console to the bottom of the fuel pressure regulator.
Insert the rubber sleeve into the bracket on the side of the engine (see figure 23) and connect the straight fitting to the regulator.
Connect the 120° fitting to port 4 on top of the FDM.
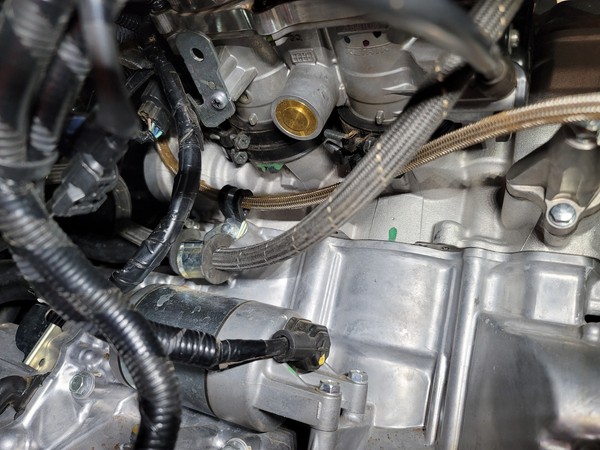
Figure 23: Routing Reference
FDM Wiring
- Connect the harness to the FDM and run all four wires along the fuel hoses into the center console.
Route the red and black wires to the battery and the two gray wires to the OEM fuel pump. Trim excess wire. - Cut the fuse holder’s wire loop to your desired leg lengths. Using the supplied blue butt splice, connect the red wire from the FDM to one leg of the fuse holder.
Crimp a ring terminal to the other leg of the fuse holder. - Crimp the other ring terminal to the black wire from the FDM.
- Using the metal butt splices and heat shrink, splice the two gray wires from the FDM into the OEM fuel pump power (brown) and ground (green). It does not matter which gray wire is hooked to the OEM pump power or ground.
- Connect the red and black wire’s ring terminals to the battery.
- Secure all wires with cable ties.
- With the electrical connector to the FDM unplugged, prime the fuel system to fill the FDM.
- Check for leaks.
- Connect the FDM electrical connector and prime the fuel system. Listen for the pump to turn on and look for the blue LED on the underside of the FDM.
- Check for leaks.
Reinstall Air box
- Reinstall air box in the reverse order that it was removed
Flash the ECU
- Generate ECU data by using the online generator located on the Injector Dynamics website at http://injectordynamics.com/utv/ and follow the directions to make the changes in the calibration.
- Once the ECU flash is complete, start the vehicle ensuring that there are no leaks in the fuel system (Always have a fire extinguisher close by).
Reinstall Body Panels
- Once you have ensured there are no leaks, reinstall all body panels in the reverse order of removal.
